2023-01-02
2012-01-09
如何在 Windows 底下添加系統服務(system service)
以下程式碼呼叫方法:
註冊服務
ruby name.rb reg
註銷服務
ruby name.rb del
服務執行之程式碼位於 service_main 區塊內
註冊服務
ruby name.rb reg
註銷服務
ruby name.rb del
服務執行之程式碼位於 service_main 區塊內
require 'rubygems'
require 'win32/service'
require 'win32/daemon'
include Win32

SERVICE_NAME = "RubyService"
SERVICE_DISPLAY_NAME = "A Ruby Service by vegafish"

if ( ARGV[ 0 ] == "reg" )
    Service.create({
        :service_name     => SERVICE_NAME,
        :service_type     => Service::WIN32_OWN_PROCESS,
        :description      => 'A custom service I wrote just for fun',
        :start_type       => Service::AUTO_START,
        :error_control    => Service::ERROR_NORMAL,
        :binary_path_name => 'c:\\ruby187\bin\ruby.exe ' + File.expand_path($0),
        :load_order_group => 'Network',
        :dependencies     => ['W32Time','Schedule'],
        :display_name     => SERVICE_DISPLAY_NAME
   })

    puts( "Service " + SERVICE_DISPLAY_NAME + " Registered." )
    Service.start( SERVICE_NAME )
    exit( 0 )
elsif ( ARGV[ 0 ] == "del" )
    if Service.status( SERVICE_NAME ).current_state == "running"
        Service.stop( SERVICE_NAME )
    end
    Service.delete( SERVICE_NAME )
    puts( "Service " + SERVICE_DISPLAY_NAME + " Removed." )
    exit( 0 )
end

class Daemon
    def service_init
        sleep( 5 )
    end

    def service_main
        filecount = 0
        watchfile = "c:\\vegafish.txt"
        while( running?() )
            sleep( 3 )
            if ( File.exists?( watchfile ) )
                filecount++
                File.rename( watchfile, watchfile + filecount.to_s )
            end
        end
    end
end

Daemon.mainloop()
2012-01-08
The Bug of Google Picasa Public URL
If you upload pictures via mobile Google+, your Picasa public URL will be changed* automatically.
This bug is not fixed at 2012-01-08.
* Changed from Gmail account to Google+ account number, e.g. http://picasaweb.google.com/vegafish -> http://picasaweb.google.com/117166741167778447153
This bug is not fixed at 2012-01-08.
* Changed from Gmail account to Google+ account number, e.g. http://picasaweb.google.com/vegafish -> http://picasaweb.google.com/117166741167778447153
2011-10-03
以 Java 實作 Base 64 Encoder
或許有人會覺得奇怪,Java 本身已經有支援 Base 64 Encoder 了,為什麼還要自己重新寫一個?
事實上,Java 平台的 Base64Encoder 需要 import sun.misc.BASE64Encoder,然而這個類別卻不是在所有平台上面都可以正常執行(我個人的經驗是,在 android 執行時會當機)。
以下為 Base 64 Encoder 實作程式碼,歡迎各位朋友切磋學習。
private static String base64_encode( byte[] bytes ) {
        String[] base64 = { "A", "B", "C", "D", "E", "F", "G", "H",
                            "I", "J", "K", "L", "M", "N", "O", "P",
                            "Q", "R", "S", "T", "U", "V", "W", "X",
                            "Y", "Z", "a", "b", "c", "d", "e", "f",
                            "g", "h", "i", "j", "k", "l", "m", "n",
                            "o", "p", "q", "r", "s", "t", "u", "v",
                            "w", "x", "y", "z", "0", "1", "2", "3",
                            "4", "5", "6", "7", "8", "9", "+", "/" };
        String encoded = "";

        int pad_length = 0;
        if ( bytes.length % 3 == 1 )
            pad_length = 2;
        else if ( bytes.length % 3 == 2 )
            pad_length = 1;

        byte[] padded = new byte[ bytes.length + pad_length ];

        for( int i = 0; i < bytes.length; ++i ) {
            padded[ i ] = bytes[ i ];
        }
        if ( pad_length == 1 ) {
            padded[ padded.length - 1 ] = 0;
        } else if ( pad_length == 2 ) {
            padded[ padded.length - 1 ] = 0;
            padded[ padded.length - 2 ] = 0;
        }

        for( int i = 0; i < padded.length; i += 3 ) {
            encoded += base64[ ( ( padded[ i ] & 255 ) >>> 2 ) ];
            encoded += base64[ ( ( ( padded[ i ] & 3 ) << 4 ) | ( ( padded[ i + 1 ] & 255 ) >>> 4 )  ) ];
            encoded += base64[ ( ( ( padded[ i + 1 ] & 15 ) << 2 ) | ( ( padded[ i + 2 ] & 255 ) >>> 6 )  ) ];
            encoded += base64[ ( padded[ i + 2 ] & 63 ) ];
        }

        encoded = encoded.substring( 0, encoded.length() - pad_length );

        if ( pad_length == 1 ) {
            encoded += "=";
        } else if ( pad_length == 2 ) {
            encoded += "==";
        }

        return encoded;
    }
2011-09-02
再玩一下 AES 加密解密
上次在這篇「玩了一下AES加密解密」裡面寫的程式碼有些缺點,就是加密過後的結果是 byte[] 而不是 String,對於 Java 的操作上不是很方便。看了幾位高手的博文,自己做了些改良,同時也將程式碼放上來拋磚引玉。主要的改良是透過 BASE64Encoder 和 BASE64Decoder 將 byte[] 轉為可讀的英文字母 + 數字字串,這在網址的傳遞上也有好處,不需要變成%xx%xx的 UTF-8 形式,更容易偵錯與閱讀,也不減少其安全性。
import javax.crypto.Cipher;
import javax.crypto.spec.IvParameterSpec;
import javax.crypto.spec.SecretKeySpec;

import sun.misc.BASE64Encoder;
import sun.misc.BASE64Decoder;

public class Base64AES {

    public static String decrypt( String key, String text ) throws Exception {
        byte [] results = decrypt( key.getBytes(), new BASE64Decoder().decodeBuffer( text ) );
        return new String( results );
    }

    public static String encrypt( String key, String text ) throws Exception {
        byte[] results = encrypt( key.getBytes(), text.getBytes() );
        return new BASE64Encoder().encode( results );
    }

    public static byte[] encrypt( byte[] key, byte[] msg ) throws Exception {
        if ( key.length != 16 ) {
            throw new IllegalArgumentException( "Key length should be 16." );
        }
        SecretKeySpec spec = new SecretKeySpec( key, "AES" );
        IvParameterSpec ivSpec = new IvParameterSpec( key );
        Cipher cipher = Cipher.getInstance( "AES/CBC/PKCS5Padding" );
        cipher.init( Cipher.ENCRYPT_MODE, spec, ivSpec );
        return cipher.doFinal( msg );
    }

    public static byte[] decrypt( byte[] key, byte[] msg ) throws Exception {
        if ( key.length != 16 ) {
            throw new IllegalArgumentException( "Key length should be 16." );
        }
        SecretKeySpec spec = new SecretKeySpec( key, "AES" );
        Cipher cipher = Cipher.getInstance( "AES/CBC/PKCS5Padding" );
        IvParameterSpec ivSpec = new IvParameterSpec( key );
        cipher.init( Cipher.DECRYPT_MODE, spec, ivSpec );
        return cipher.doFinal( msg );
    }

    public static void main( String[] args ) throws Exception {
        String msg = "This is so easy.";

        System.out.println( "原字串: " + msg );
        System.out.println( "加密後: " + encrypt( "vegafish12345678" , msg ) );
        System.out.println( "解密後: " + decrypt( "vegafish12345678", encrypt( "vegafish12345678" , msg ) ) );
    }

}
執行結果如下:
原字串: This is so easy.
加密後: KczRl5uSsrgfwWRKpfR5FoKEIVU0jPvxX1VsEYl/jl0=
解密後: This is so easy.
2011-08-24
玩了一下AES加密解密
我將自己寫的程式碼貼上來,這是很簡短的程式,希望高手能稍加提點我自己不足之處。
import javax.crypto.Cipher;

import javax.crypto.spec.SecretKeySpec;


public class TestAES {


    public static byte[] encrypt( byte[] msg ) throws Exception {

        byte[] key = "vegafish12345678".getBytes();  // key 長度 = 16

        return encrypt( key, msg );

    }


    public static byte[] encrypt( byte[] key, byte[] msg ) throws Exception {

        if ( key.length != 16 ) {

            throw new IllegalArgumentException( "Key length should be 16." );

        }

        SecretKeySpec spec = new SecretKeySpec( key, "AES" );

        Cipher cipher = Cipher.getInstance( "AES" );

        cipher.init( Cipher.ENCRYPT_MODE, spec );

        return cipher.doFinal( msg );

    }


    public static byte[] decrypt( byte[] msg ) throws Exception {

        byte[] key = "vegafish12345678".getBytes();  // key 長度 = 16

        return decrypt( key, msg );

    }


    public static byte[] decrypt( byte[] key, byte[] msg ) throws Exception {

        if ( key.length != 16 ) {

            throw new IllegalArgumentException( "Key length should be 16." );

        }

        SecretKeySpec spec = new SecretKeySpec( key, "AES" );

        Cipher cipher = Cipher.getInstance( "AES" );

        cipher.init( Cipher.DECRYPT_MODE, spec );

        return cipher.doFinal( msg );

    }


    public static void main( String[] args ) throws Exception {

        String msg = "要被加密的訊息, the text would be encrypted.";


        System.out.println( "原始String  : " + msg );

        System.out.println( "byte[]加密後: " + new String( encrypt( msg.getBytes() ) ) );

        System.out.println( "byte[]解密後: " + new String( decrypt( encrypt( msg.getBytes() ) ) ) );

    }


}
2011-05-04
使用 RMaps 記錄路徑並匯出到 Google Maps
RMaps 是 android 的地圖應用程式,一般用在手機無網路連線時,來觀看離線地圖。如何下載並製作離線地圖在 Dr. TYT 的 Android 地圖 有教學,這裡就不贅述了。
但其實很少人知道,RMaps 有如同另一個應用程式 My Tracks 的功能,可以記錄手機移動的路徑,並且可以匯出到 Google maps 做記錄。以下為使用此功能的步驟詳解:
1. 開啟 RMaps,並叫出功能表,點選 Tracks 選項。如圖一所示:
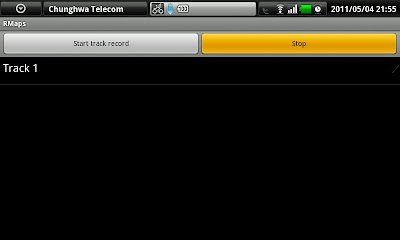
2. 欲開始記錄路徑時,點選 Start track record 按鈕。如圖二所示:
3. 正在記錄路徑的過程中,會在 android 狀態列顯示一個腳踏車的圖示,使用者可以根據這個圖示知道 RMaps 正在記錄,也可以點選它回到 RMaps 程式中。如圖三所示:
4. 路徑記錄完畢之後,點選 Stop 停止記錄。如圖四所示:
5. 點選路徑名稱標籤右方的綠色勾勾,該條路徑就會顯示在 RMaps 的地圖上,此步驟只和 RMaps 的顯示有關,若不想顯示路徑記錄可以略過。如圖五、六所示:
6. 長按路徑名稱標籤,叫出選單後,選擇 Export to KML file。如圖七所示:
7. 在步驟6.之後,記憶卡中的 \rmaps\export 目錄下,會看到一個 路徑名稱.kml 的檔案,這就是剛剛所匯出的路徑檔。
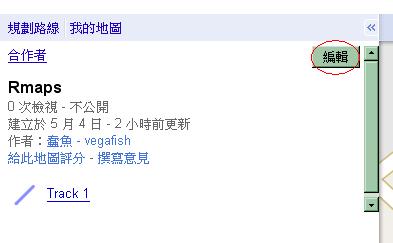
8. 在 Google maps 自己建的地圖內,點選 編輯 按鈕。如圖八所示:
9. 在地圖的編輯模式下,點選 匯入。如圖九所示:
10. 選擇步驟7.所看到的 kml 檔,再按 從檔案上載 按鈕,完成後即可在自建地圖內看到 RMaps 所記錄的路徑了。如圖十所示:
但其實很少人知道,RMaps 有如同另一個應用程式 My Tracks 的功能,可以記錄手機移動的路徑,並且可以匯出到 Google maps 做記錄。以下為使用此功能的步驟詳解:
1. 開啟 RMaps,並叫出功能表,點選 Tracks 選項。如圖一所示:
 |
| 圖一 |
2. 欲開始記錄路徑時,點選 Start track record 按鈕。如圖二所示:
 |
| 圖二 |
3. 正在記錄路徑的過程中,會在 android 狀態列顯示一個腳踏車的圖示,使用者可以根據這個圖示知道 RMaps 正在記錄,也可以點選它回到 RMaps 程式中。如圖三所示:
 |
| 圖三 |
4. 路徑記錄完畢之後,點選 Stop 停止記錄。如圖四所示:
 |
| 圖四 |
5. 點選路徑名稱標籤右方的綠色勾勾,該條路徑就會顯示在 RMaps 的地圖上,此步驟只和 RMaps 的顯示有關,若不想顯示路徑記錄可以略過。如圖五、六所示:
 |
| 圖五 |
 |
| 圖六 |
6. 長按路徑名稱標籤,叫出選單後,選擇 Export to KML file。如圖七所示:
 |
| 圖七 |
7. 在步驟6.之後,記憶卡中的 \rmaps\export 目錄下,會看到一個 路徑名稱.kml 的檔案,這就是剛剛所匯出的路徑檔。
8. 在 Google maps 自己建的地圖內,點選 編輯 按鈕。如圖八所示:
 |
| 圖八 |
9. 在地圖的編輯模式下,點選 匯入。如圖九所示:
 |
| 圖九 |
10. 選擇步驟7.所看到的 kml 檔,再按 從檔案上載 按鈕,完成後即可在自建地圖內看到 RMaps 所記錄的路徑了。如圖十所示:
 |
| 圖十 |
2010-11-04
Ruby 驅動外部程式的方法: %x, exec, system, IO.popen
以下外部程式名稱以「external_cmd」為範例
Linux 前景執行外部程式指令:
或以背景執行外部程式:
1. %x 是最普遍的方法,用在想要取得外部程式的標準輸出結果,但該外部程式不需要標準輸入時。另外,無論是否以背景執行該外部程式,呼叫 %x 的 ruby 程式皆會等待外部程式結束,才會繼續執行。
Ruby 範例程式碼如下,執行外部程式的輸出會儲存在 external_cmd_output 變數內。注意{}裡面並不需要再用雙引號來框住指令。另外,%x 方法和 `` 語法相同。
2. exec 方法會在執行外部程式完畢以後,終止呼叫 exec 的 ruby 程式,不傳回任何值。
Ruby 範例程式碼如下。
3. system 方法會在執行外部程式完畢以後,傳回執行的結果,成功則傳回 true,失敗則傳回 false。system 和 %x 方法的不同之處,除了傳回值不一樣,我認為使用的時機最大的不同點在於執行背景程式的時刻。以 %x 背景執行外部程式時,會等待該外部程式結束後,再執行下一行 ruby 程式;然而以 system 背景執行外部程式時,在傳回執行結果後,無須等待外部程式結束即執行下一行 ruby 程式。
Ruby 範例程式碼如下,執行外部程式的結果(成功與否)會儲存在 external_cmd_result 變數內。
4. IO.popen 方法適用於外部程式需要標準輸入的時候,如互動式的外部程式。若 IO.popen 執行的外部程式需要標準輸入時,在標準輸入串流被關閉後才會開始執行。
Ruby 範例程式碼如下,其中「text of output」這段文字會被輸入到 external_cmd 的標準輸入,另外 external_cmd 的標準輸出會被 puts 印出。
Linux 前景執行外部程式指令:
# external_cmd或以背景執行外部程式:
# external_cmd &1. %x 是最普遍的方法,用在想要取得外部程式的標準輸出結果,但該外部程式不需要標準輸入時。另外,無論是否以背景執行該外部程式,呼叫 %x 的 ruby 程式皆會等待外部程式結束,才會繼續執行。
Ruby 範例程式碼如下,執行外部程式的輸出會儲存在 external_cmd_output 變數內。注意{}裡面並不需要再用雙引號來框住指令。另外,%x 方法和 `` 語法相同。
external_cmd_output = %x{external_cmd}
external_cmd_output = %x{external_cmd &}
external_cmd_output = `external_cmd`
external_cmd_output = `external_cmd &`
2. exec 方法會在執行外部程式完畢以後,終止呼叫 exec 的 ruby 程式,不傳回任何值。
Ruby 範例程式碼如下。
exec "external_cmd"
puts "never get here."  # 這一行的 ruby 程式不會被執行
3. system 方法會在執行外部程式完畢以後,傳回執行的結果,成功則傳回 true,失敗則傳回 false。system 和 %x 方法的不同之處,除了傳回值不一樣,我認為使用的時機最大的不同點在於執行背景程式的時刻。以 %x 背景執行外部程式時,會等待該外部程式結束後,再執行下一行 ruby 程式;然而以 system 背景執行外部程式時,在傳回執行結果後,無須等待外部程式結束即執行下一行 ruby 程式。
Ruby 範例程式碼如下,執行外部程式的結果(成功與否)會儲存在 external_cmd_result 變數內。
external_cmd_result = system "external_cmd"
external_cmd_result = system "external_cmd &"
4. IO.popen 方法適用於外部程式需要標準輸入的時候,如互動式的外部程式。若 IO.popen 執行的外部程式需要標準輸入時,在標準輸入串流被關閉後才會開始執行。
Ruby 範例程式碼如下,其中「text of output」這段文字會被輸入到 external_cmd 的標準輸入,另外 external_cmd 的標準輸出會被 puts 印出。
IO.popen( "external_cmd", 'r+' ) do |pipe|
    pipe.puts "text of output"
    pipe.close_write
    puts pipe.read
end
2010-09-09
Ubuntu 10.04 LTS 安裝 Ruby 1.9.2 + SQLite 3 + Rails 3.0.0
註:本文件描述由無到有的 ruby 安裝流程,並不適合用在升級 ruby 套件的使用情境。
更新日期: 2010-09-10
1. 安裝所需的函式庫:
2. 安裝 ruby version manager (RVM),其中有個步驟需要變更使用者為 root:
3. 安裝 ruby 1.9.2 (含 rubygems 1.3.7):
[可省略] 檢查 ruby 版本:
畫面應顯示:
3. 安裝 sqlite3 和 sqlite3-ruby 套件:
4. 安裝 rails 並製造一個 rails 命令的捷徑:
[可省略] 檢查 rails 版本:
畫面應顯示:
更新日期: 2010-09-10
1. 安裝所需的函式庫:
$ sudo apt-get install curl git-core build-essential zlib1g-dev libssl-dev libreadline5-dev
2. 安裝 ruby version manager (RVM),其中有個步驟需要變更使用者為 root:
$ sudo bash < <( curl http://rvm.beginrescueend.com/releases/rvm-install-head )
$ sudo su
$ mkdir -p ~/.rvm/src/ && cd ~/.rvm/src && rm -rf ./rvm/ && git clone --depth 1 git://github.com/wayneeseguin/rvm.git && cd rvm && ./install
$ exit
3. 安裝 ruby 1.9.2 (含 rubygems 1.3.7):
$ sudo rvm install 1.9.2
$ sudo rvm --default ruby-1.9.2
[可省略] 檢查 ruby 版本:
$ ruby -v
畫面應顯示:
ruby 1.9.2p0 (2010-08-18 revision 29036) [i686-linux]
3. 安裝 sqlite3 和 sqlite3-ruby 套件:
$ sudo apt-get install sqlite3 libsqlite3-dev
$ sudo gem install sqlite3-ruby
4. 安裝 rails 並製造一個 rails 命令的捷徑:
$ sudo gem install rails
$ sudo ln -s -f /usr/local/rvm/gems/ruby-1.9.2-p0/gems/rails-3.0.0/bin/rails /usr/bin/rails
[可省略] 檢查 rails 版本:
$ rails -v
畫面應顯示:
Rails 3.0.0
2010-08-24
Ubuntu 10.04 LTS 安裝 Ruby 1.8.7 + SQLite 3 + Rails 2.3.8
2010-09-09 更新:修改5.,指定 Rails 安裝版本。
1. 安裝 ruby 1.8.7:
[可省略] 檢查 ruby 版本,螢幕應顯示 ruby 1.8.7 (2010-01-10 patchlevel 249):
2. 安裝 gems 1.3.5:
[可省略] 檢查 rubygems 版本,螢幕應顯示 1.3.5:
3. 安裝 sqlite 3:
4. 安裝 ruby 支援 sqlite3 的套件:
5. 安裝 rails 並製造一個 rails 命令的捷徑:
[可省略] 檢查 rails 版本,顯示畫面其中一行應為 rails (2.3.8):
1. 安裝 ruby 1.8.7:
$ sudo apt-get install ruby-full
[可省略] 檢查 ruby 版本,螢幕應顯示 ruby 1.8.7 (2010-01-10 patchlevel 249):
$ ruby -v
2. 安裝 gems 1.3.5:
$ sudo apt-get install rubygems
[可省略] 檢查 rubygems 版本,螢幕應顯示 1.3.5:
$ gem -v
3. 安裝 sqlite 3:
$ sudo apt-get install sqlite3
$ sudo apt-get install libsqlite3-dev
4. 安裝 ruby 支援 sqlite3 的套件:
$ sudo gem install sqlite3-ruby
5. 安裝 rails 並製造一個 rails 命令的捷徑:
$ sudo gem install rails --version 2.3.8
$ sudo ln -s -f /var/lib/gems/1.8/bin/rails /usr/bin/rails
[可省略] 檢查 rails 版本,顯示畫面其中一行應為 rails (2.3.8):
$ gem list
2010-08-23
Ubuntu 10.04 LTS 安裝 Ruby 1.9.1 + Rails 2.3.8
2010-09-09 更新:Ruby 1.9.1 是不穩定的版本,並不建議依照本篇的方式安裝。請讀者參考另外兩篇以完成環境建置:
Ubuntu 10.04 LTS 安裝 Ruby 1.9.2 + SQLite 3 + Rails 3.0.0
Ubuntu 10.04 LTS 安裝 Ruby 1.8.7 + SQLite 3 + Rails 2.3.8
1. 安裝 ruby 1.9.1:
[可省略] 檢查 ruby 版本,應為 ruby 1.9.1:
2. 安裝 gems for ruby 1.9.1:
[可省略] 檢查 rubygems 版本,應為 1.3.5:
3. 安裝 sqlite 3:
4. 安裝 ruby 支援 sqlite 的套件:
5. 安裝 rails:
[可省略] 檢查 rails 版本,應為 rails (2.3.8):
Ubuntu 10.04 LTS 安裝 Ruby 1.9.2 + SQLite 3 + Rails 3.0.0
Ubuntu 10.04 LTS 安裝 Ruby 1.8.7 + SQLite 3 + Rails 2.3.8
1. 安裝 ruby 1.9.1:
$ sudo apt-get install ruby1.9.1-full
$ sudo ln -s -f /usr/bin/ruby1.9.1 /usr/bin/ruby
[可省略] 檢查 ruby 版本,應為 ruby 1.9.1:
$ ruby -v
2. 安裝 gems for ruby 1.9.1:
$ sudo apt-get install rubygems1.9.1
$ sudo ln -s -f /usr/bin/gem1.9.1 /usr/bin/gem
[可省略] 檢查 rubygems 版本,應為 1.3.5:
$ gem -v
3. 安裝 sqlite 3:
$ sudo apt-get install sqlite3
$ sudo apt-get install libsqlite3-dev
4. 安裝 ruby 支援 sqlite 的套件:
$ sudo gem install sqlite3-ruby
5. 安裝 rails:
$ sudo gem install rails
$ sudo ln -s -f /var/lib/gems/1.9.1/bin/rails /usr/bin/rails
[可省略] 檢查 rails 版本,應為 rails (2.3.8):
$ gem list
2010-03-08

2010-01-21
在 Linux 上搬移 mysql 資料庫存放目錄
1. 停止 mysql 服務。
2. 新增一個 mysql 資料庫的存放目錄 (以下以 /database/mysql 為例)。
3. 複製舊資料庫檔案 (通常存放在 /var/lib/mysql 目錄內) 至新目錄內。
4. 更改新目錄與其內容的擁有者為 mysql。
5. 用文字編輯器修改 mysql 設定檔 (通常為 /etc/my.cnf),將 /var/lib/mysql 改為 /database/mysql。
6. 啟動 mysql 服務。
# service mysqld stop
2. 新增一個 mysql 資料庫的存放目錄 (以下以 /database/mysql 為例)。
# mkdir /database/mysql
3. 複製舊資料庫檔案 (通常存放在 /var/lib/mysql 目錄內) 至新目錄內。
# cp -r /var/lib/mysql /database/mysql
4. 更改新目錄與其內容的擁有者為 mysql。
# chown -R mysql:mysql /database/mysql
5. 用文字編輯器修改 mysql 設定檔 (通常為 /etc/my.cnf),將 /var/lib/mysql 改為 /database/mysql。
# vim /etc/my.cnf
6. 啟動 mysql 服務。
# service mysqld start
2009-12-04
以 Eclipse 作為 Ruby 程式開發環境
Eclipse 是一個跨平臺的免費開發環境,一開始是 IBM 所開發,用在 Java 程式設計上。但現在 Eclipse 已經成為一個開放原始碼的計畫,並且許多人使用它來當作各種程式的開發環境。
以下將說明,以 Eclipse 當作 Ruby 開發環境的步驟,版本分別為 eclipse 3.5 (Galileo) 與 ruby 1.8.x。
下載與安裝 Eclipse:
Eclipse 下載頁面,如果程式開發者會把 clipse 當作 Java開發環境時,請使用 Eclipse IDE for Java Developers,否則請使用 Eclipse IDE for C/C++ Developers,並依照開發環境的作業系統選擇下載連結。
若開發環境已安裝了 JRE (Java Runtime Environment) ,下載後僅需要解壓縮即可執行。若開發者不知道自己的開發環境是否已安裝 JRE,請至 Sun 公司的這個網頁檢查是否正確的安裝了 JRE。
在 Eclipse 安裝與執行的過程中,並不會把任何資訊寫入 Windows 的登錄系統 (registry) 內,因此 Eclipse 安裝與反安裝的過程都是很容易的:安裝時只要解壓縮,反安裝時只要把存放 Eclipse 執行檔的目錄刪除即可。
下載與安裝 Ruby:
在 Windows 環境下,建議使用 Ruby 1.8.6 One-Click Installer,也可至官方的Ruby 下載頁面自行下載。下載後請直接執行該程式,它會自動將 Ruby 安裝至開發環境內。
在 Ubuntu Linux 環境下,僅需輸入 sudo apt-get install ruby irb rdoc 指令(需 root 密碼與連上網路)即可下載與完成安裝。
開啟 Eclipse 後,選工作列的 Help 選項下的 Install New Software...

在 Work with: 輸入框內,下拉並選擇 Galileo - http://download.eclipse.org/releases/galileo
在中央的方框中,將 Programming Languages 展開並勾選 Dynamic Languages Toolkit - Ruby Development Tools

點選 Next > 兩次,選 I accept the terms of the license of agreements,然後點 Finish 按鈕。
Eclipse 會花上一段時間來下載並安裝新的功能,安裝好以後會要求使用者重開 Eclipse。

點選工具列 Window 選項下的 Preferences 選項,展開左邊方框的 Ruby 並點選 Interpreters,點選 Add... 按鈕。
在 Interpreter name: 方框內填入 Ruby 1.8.x,在 Interpreter executable: 方框內填入 ruby安裝目錄/bin/ruby執行檔 (這會根據作業系統與安裝過程而不同,請依照當初安裝 Ruby 時的環境設定輸入),然後點 OK 按鈕。

點選工具列 Window 選項下的 Open Perspective 選項下的 Other... 選項,選擇方框內的 Ruby 並點選 OK 按鈕。

如此一來就可以在 Eclipse 環境下編寫 Ruby 程式並執行了!
以下將說明,以 Eclipse 當作 Ruby 開發環境的步驟,版本分別為 eclipse 3.5 (Galileo) 與 ruby 1.8.x。
下載與安裝 Eclipse:
Eclipse 下載頁面,如果程式開發者會把 clipse 當作 Java開發環境時,請使用 Eclipse IDE for Java Developers,否則請使用 Eclipse IDE for C/C++ Developers,並依照開發環境的作業系統選擇下載連結。
若開發環境已安裝了 JRE (Java Runtime Environment) ,下載後僅需要解壓縮即可執行。若開發者不知道自己的開發環境是否已安裝 JRE,請至 Sun 公司的這個網頁檢查是否正確的安裝了 JRE。
在 Eclipse 安裝與執行的過程中,並不會把任何資訊寫入 Windows 的登錄系統 (registry) 內,因此 Eclipse 安裝與反安裝的過程都是很容易的:安裝時只要解壓縮,反安裝時只要把存放 Eclipse 執行檔的目錄刪除即可。
下載與安裝 Ruby:
在 Windows 環境下,建議使用 Ruby 1.8.6 One-Click Installer,也可至官方的Ruby 下載頁面自行下載。下載後請直接執行該程式,它會自動將 Ruby 安裝至開發環境內。
在 Ubuntu Linux 環境下,僅需輸入 sudo apt-get install ruby irb rdoc 指令(需 root 密碼與連上網路)即可下載與完成安裝。
開啟 Eclipse 後,選工作列的 Help 選項下的 Install New Software...
在 Work with: 輸入框內,下拉並選擇 Galileo - http://download.eclipse.org/releases/galileo
在中央的方框中,將 Programming Languages 展開並勾選 Dynamic Languages Toolkit - Ruby Development Tools
點選 Next > 兩次,選 I accept the terms of the license of agreements,然後點 Finish 按鈕。
Eclipse 會花上一段時間來下載並安裝新的功能,安裝好以後會要求使用者重開 Eclipse。
點選工具列 Window 選項下的 Preferences 選項,展開左邊方框的 Ruby 並點選 Interpreters,點選 Add... 按鈕。
在 Interpreter name: 方框內填入 Ruby 1.8.x,在 Interpreter executable: 方框內填入 ruby安裝目錄/bin/ruby執行檔 (這會根據作業系統與安裝過程而不同,請依照當初安裝 Ruby 時的環境設定輸入),然後點 OK 按鈕。
點選工具列 Window 選項下的 Open Perspective 選項下的 Other... 選項,選擇方框內的 Ruby 並點選 OK 按鈕。
如此一來就可以在 Eclipse 環境下編寫 Ruby 程式並執行了!
2009-11-30
ubuntu 9.04 bluetooth 自動輸入裝置 PIN 碼並自動配對
在 ubuntu 上,藍牙介面是由 bluez 實作,而 ubuntu 8.xx + BlueZ 3.x 以前,作業系統與藍牙裝置的 PIN 配對流程是由 passkey-agent 、 pin-helper 或 hcid.conf 完成的。但在最新版的 ubuntu 與 bluez,是由另一種方法自動完成作業系統與藍牙裝置的 PIN 配對程序。
以下步驟主要說明,在 ubuntu 9.04 + BlueZ 4.3x 下,如何使作業系統自動輸入藍牙裝置的 PIN 碼並且自動配對。(~$ 是作業系統的提示符號,不用輸入。)
顯示本機藍牙 adapter 位址的指令,hci0與11:22:33:44:55:66就是本機端的藍牙天線的名稱與位址。
掃描遠端藍牙裝置的名稱與位址,66:55:44:33:22:11與Remote_Device_Name就是遠端藍牙裝置的位址與名稱。
編輯 /etc/bluetooth/rfcomm.conf ,將遠端藍牙裝置加入連線列表,新增內容如下。
修改或新增 /var/lib/bluetooth/11:22:33:44:55:66/pincodes (要注意目錄名稱含有本機端藍牙天線的位址),若無此檔案則配對時會要求使用者輸入 PIN 碼,文字檔內第一個參數為遠端藍牙裝置的位址,第二個參數為藍牙裝置的 PIN 碼。範例如下。
與遠端藍牙裝置連線:
若要建立本機端 serial port,N是在 rfcomm.conf 內所填入的編號,此 serial port 會建立在 /dev/rfcommN 目錄。
以下步驟主要說明,在 ubuntu 9.04 + BlueZ 4.3x 下,如何使作業系統自動輸入藍牙裝置的 PIN 碼並且自動配對。(~$ 是作業系統的提示符號,不用輸入。)
顯示本機藍牙 adapter 位址的指令,hci0與11:22:33:44:55:66就是本機端的藍牙天線的名稱與位址。
~$ hcitool dev
Devices:
        hci0    11:22:33:44:55:66
掃描遠端藍牙裝置的名稱與位址,66:55:44:33:22:11與Remote_Device_Name就是遠端藍牙裝置的位址與名稱。
~$ hcitool scan
Scanning ...
        66:55:44:33:22:11     Remote_Device_Name
編輯 /etc/bluetooth/rfcomm.conf ,將遠端藍牙裝置加入連線列表,新增內容如下。
rfcommN {                          # N請取代成任意整數,如 0, 1, 2 等
        bind yes;
        device 66:55:44:33:22:11;  # 填入剛剛掃描到的遠端藍牙裝置位址
        channel 1;
        comment "Remote Device";
}
修改或新增 /var/lib/bluetooth/11:22:33:44:55:66/pincodes (要注意目錄名稱含有本機端藍牙天線的位址),若無此檔案則配對時會要求使用者輸入 PIN 碼,文字檔內第一個參數為遠端藍牙裝置的位址,第二個參數為藍牙裝置的 PIN 碼。範例如下。
66:55:44:33:22:11 4321
AA:BB:CC:DD:EE:FF 000000
與遠端藍牙裝置連線:
~$ sudo hcitool cc 66:55:44:33:22:11
若要建立本機端 serial port,N是在 rfcomm.conf 內所填入的編號,此 serial port 會建立在 /dev/rfcommN 目錄。
~$ sudo rfcomm connect N
Connected /dev/rfcommN to 66:55:44:33:22:11 on channel 1
Press CTRL-C for hangup
訂閱:
文章 (Atom)